
Accomplishments
- Hosting Architecture and Pricing Research
- Multi-floor Diorama Workflow Research
Bonus
- 360 Reconstruction Research
“Plans are nothing; planning is everything.” – Dwight D. Eisenhower
Virtual tours must be delivered efficiently and reliably. These two requirements drove much of my research this week. While I didn’t make any direct updates to the software, the development path has become much clearer. I spent time refining the hosting and service requirements for delivering 360 tour files over the web, and outlined workflows for handling multi-floor and large-space 3D reconstructions. After refining the initial workflow and identifying its bottlenecks, I began exploring and evaluating alternative solutions.
Multi-floor Diorama Workflow Research
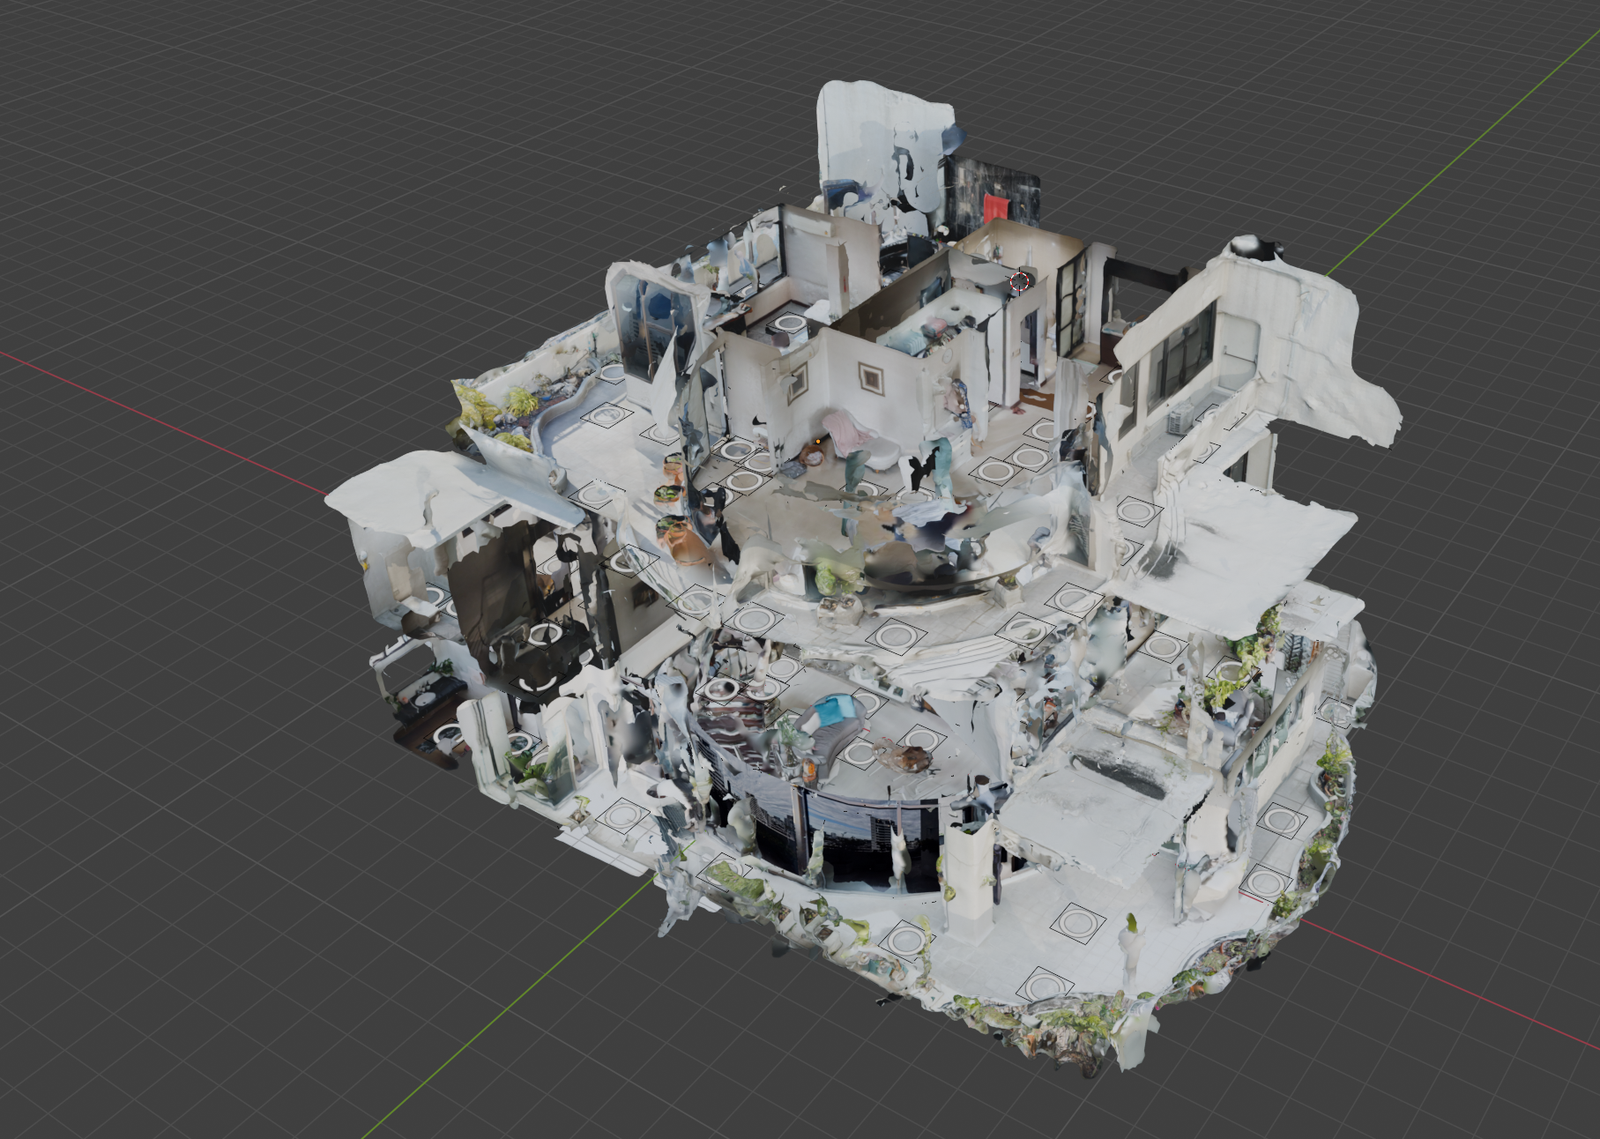
Dioramas provide an eye-catching overview of a 3D scene and offer an intuitive way to navigate a tour. In a previous post, I made my first attempt at creating a usable tour for a dense, three-story property. However, the workflow I used was time-consuming, prone to system crashes, and ultimately unscalable. This week, I challenged myself to test alternative workflows to deliver this service more effectively.
As a quick refresher, dioramas are 3D models that represent a physical space. These models need to reflect the environment with enough visual accuracy so that viewers can easily figure out where they are and where they want to go. Crucially, this navigation must happen without lag. Because 3D models and their associated images can have large file sizes that take time to load over the internet, we must carefully balance visual quality with performance.
In my previous workflow, I started with a flat “plane”, essentially a digital piece of paper. I would cut and stretch the edges until it matched the floor plan, then stretch the sides up to build the walls. After that, I added the ceiling and interior details like countertops, appliances, and inner walls. The result was an incredibly low-poly object with a small file size, but the manual labor required to build it was unreasonable. Furthermore, the process put incredible stress on the 3D modeling program, which struggled to load over 100 uncompressed 11K .jpg files just to calculate the model’s textures. It was a great learning exercise, but it highlighted the severe challenges of recreating spaces manually.
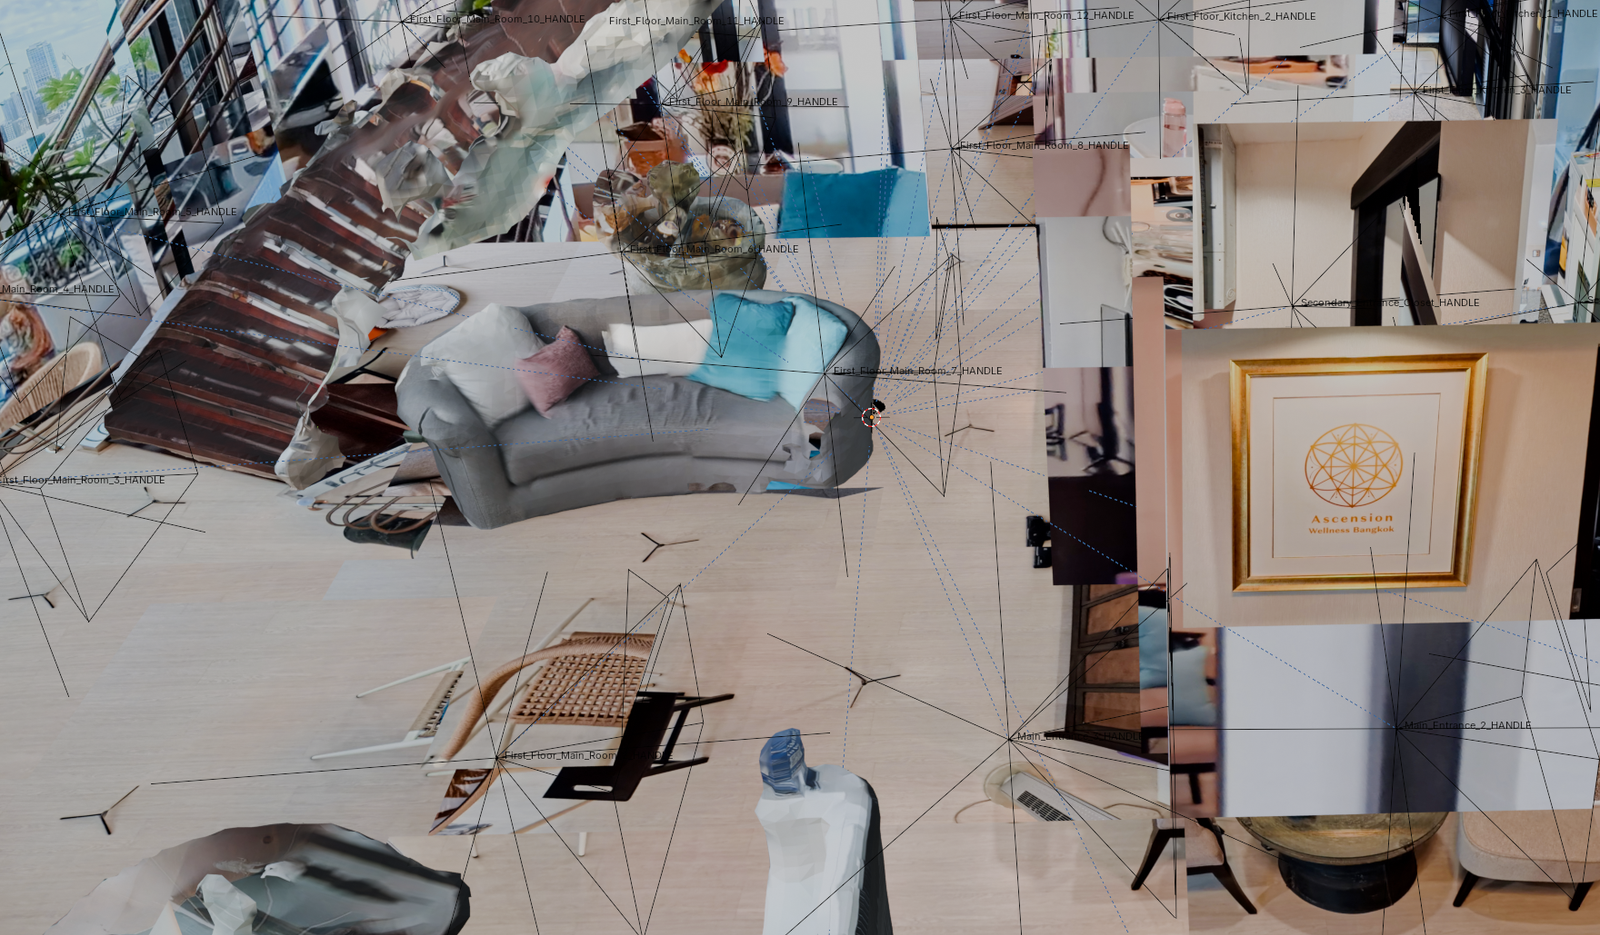
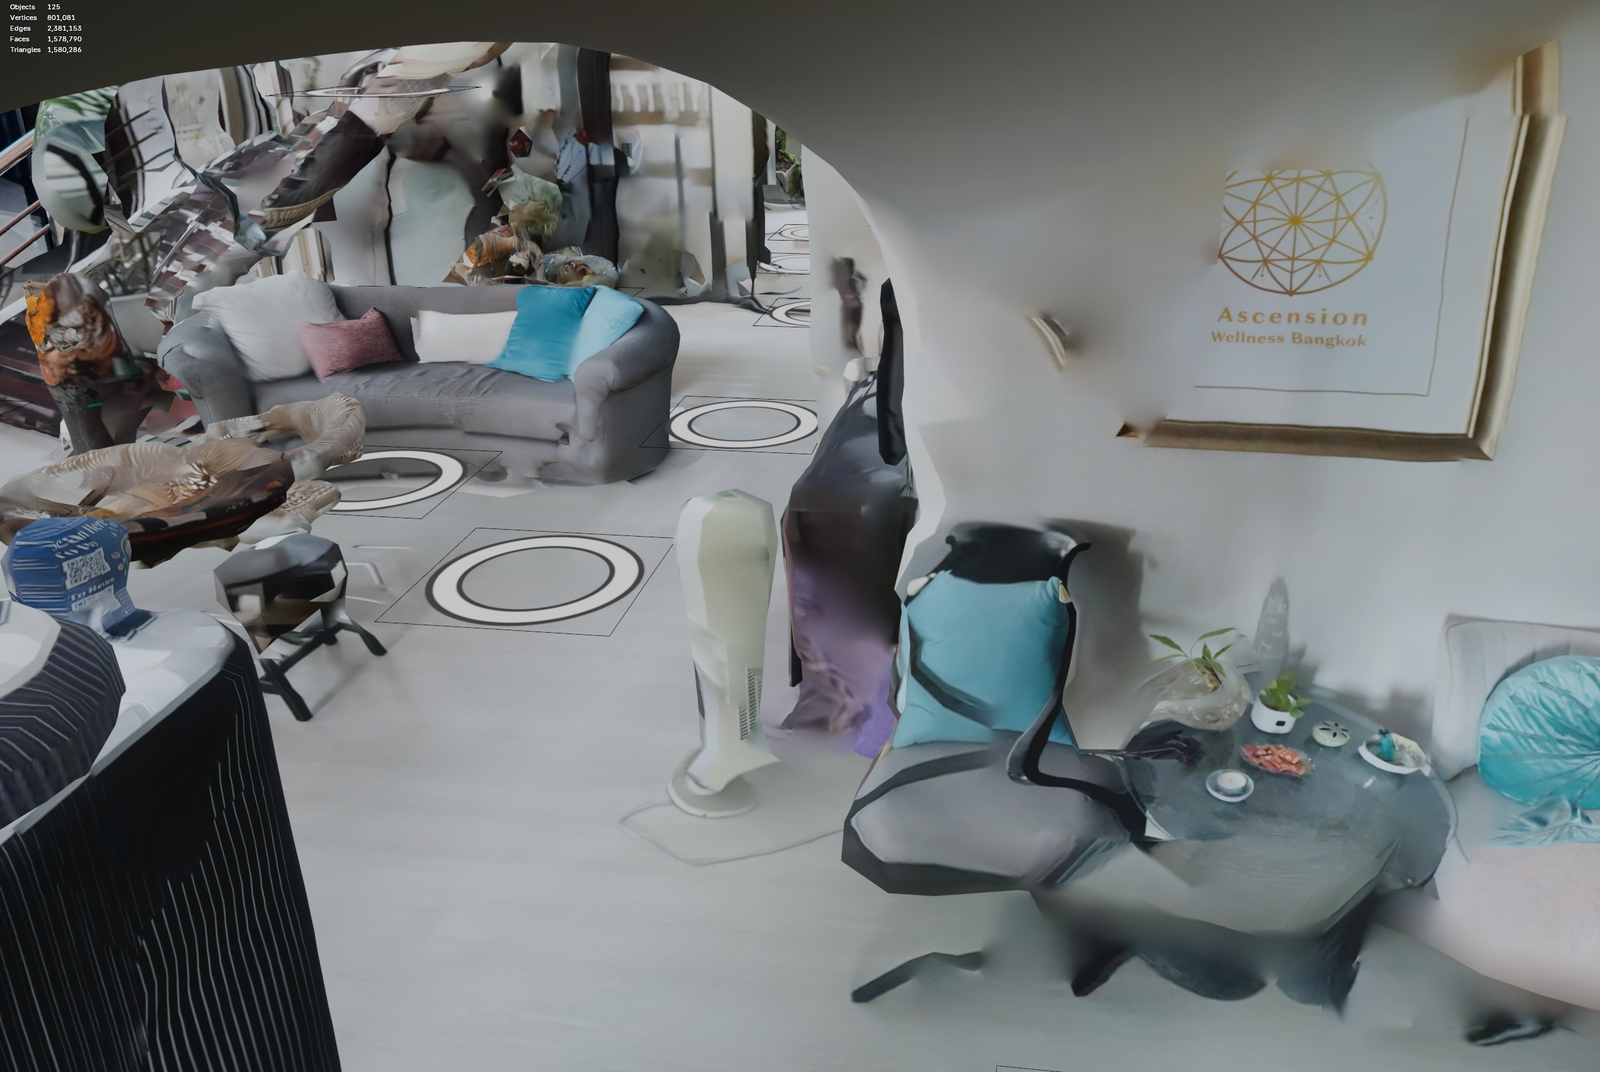
For my second iteration, I tried to speed up the manual recreation by starting with a cube instead of a flat plane. Stretching and cutting a cube handled the floor, walls, and ceiling simultaneously, drastically increasing the speed of the build. However, this process still took considerable time and completely missed smaller, non-cubic details like couches or shelves. Without these details, the visual “hotspots” weren’t properly occluded from one another, causing their circular icons to appear cut or incomplete. Adding those missing details manually would simply add that saved time right back into the process.
This second workflow also involved texturing the 3D model by projecting portions of the 360-degree photos onto the digital walls and floors. When done perfectly, the high resolution of the 360 images creates a fantastic display. In practice, however, it requires massive manual effort. The 3D surfaces are divided into sections, and the software decides which parts of the image to project based on distance and angle—not based on what looks best. This forces you to go back through the scene and manually adjust the surfaces to use the correct image projections. The smallest model I created for the three-story home had over 5,000 triangle surfaces requiring manual review. That is simply not acceptable.
In my third attempt, I decided to sacrifice file size in favor of speed. I used the raw photogrammetry scan taken on location as the 3D model itself. Unfortunately, phone-generated photogrammetry scans still require significant manual intervention. The datasets needed to generate full-house scans are often too large for a phone’s memory, meaning you have to take multiple smaller scans and manually align them. The edges of these stitched pieces often feature incomplete or warped geometry—a wall might flare out unnaturally, or a room at the edge of the scan might devolve into a discolored blob. All of this requires manual cleanup.
Photogrammetry also struggles heavily with reflections. This can be as obvious as a mirror or as subtle as the glossy sheen on a wooden dresser. Reflective surfaces create strange, warped artifacts in the scene that look incredibly uncanny to a viewer trying to admire a space. Furthermore, if certain angles aren’t captured perfectly, they render as large, undefined blobs. All these anomalies degrade the final output and require time-consuming manual fixes. The result is far from perfect, heavily bloated in file size, and costly to produce in terms of time.
So, how can we improve? There are a few remaining options that might reduce the manual labor required for these low-poly reconstructions:
- The tool used for texturing the walls has a feature to texture based on vertex groups. This has the potential to quickly map individual cameras to vast areas of triangles, greatly reducing texturing time.
- Camera positions could be calculated using Structure from Motion (SfM) algorithms. This would eliminate the need to manually place and align each camera in the digital space.
- We could abandon the diorama entirely for larger scenes, using a basic, untextured mesh solely for occlusion and hotspot placement.
While each of these options improves the process slightly, they still fail to overcome the biggest hurdle: the manual labor required to piece everything together. To offer 3D reconstructions at larger scales, the process must be heavily automated. It needs to produce a consistent, high-quality output that visually supports seamless navigation, and it must compress down enough to download quickly and run smoothly within the memory constraints of mobile devices.
Hosting Architecture and Pricing Research
Everything you see on the internet lives on a physical computer somewhere and travels over a network to reach you. Companies offer this service at a cost, differentiating themselves based on how they deliver that content. The virtual tours I create, along with the business website that hosts them, will both require reliable hosting.
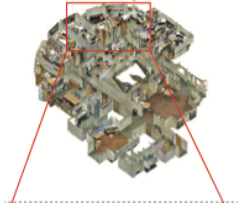
My goal is to store and stream a high volume of files ranging from a few kilobytes to 60MB. Even simple tours, like the one for this resort in Pattaya, include over 15,000 individual files! I also want to offer a flat hosting rate for my partners. However, the actual costs of server maintenance and hosting are rarely flat and fluctuate monthly. The variables affecting these costs depend entirely on the hosting provider.
Cloud Computing Services: Hosting platforms like Amazon Web Services (AWS), Google Cloud Platform, and Microsoft Azure require manual maintenance for servers and security, which drives up labor costs. On top of that, they often charge for CPU utilization, bandwidth, or the sheer size of the data being read. These costs can skyrocket if a single tour goes viral. Alternatively, a malicious Distributed Denial of Service (DDoS) attack or a glitched web crawler could lead to thousands of artificial page hits, causing a massive billing spike without bringing in any actual viewers. These cloud options are overkill for this specific job and carry too many unpredictable risks to offer partners a stable flat rate.
Shared Hosting Services: Shared hosts like GoDaddy, HostGator, and Hostinger handle security for you and charge flat monthly rates regardless of CPU or bandwidth usage. These services are primarily designed for distributing static web pages and a limited amount of related content. They usually impose strict limits on the total number of files you can store (known as inodes), which file-heavy virtual tours will exhaust almost immediately. They also limit concurrent bandwidth to control their own costs and ensure the server remains stable for other clients sharing that space. While this setup works perfectly for a standard business website with text and product pages, it causes severe slowdowns for tours experiencing high traffic and is generally too slow to support smooth video streaming.
Object Storage: Services like Cloudflare R2, Amazon S3, and Bunny.net are designed to serve individual files immediately upon request. Think of them as giant hard drives living in the cloud. Since virtual tours are essentially just thousands of individual files, this architecture works exceptionally well. However, pricing models vary. Cloudflare and Bunny.net offer flat rates based on storage space and read/write operations, regardless of file size. Amazon S3 operates differently and still charges for bandwidth. While object storage is incredible for hosting the raw tour files, these platforms lack the ability to run a content management system (CMS) or install website builders like WordPress.
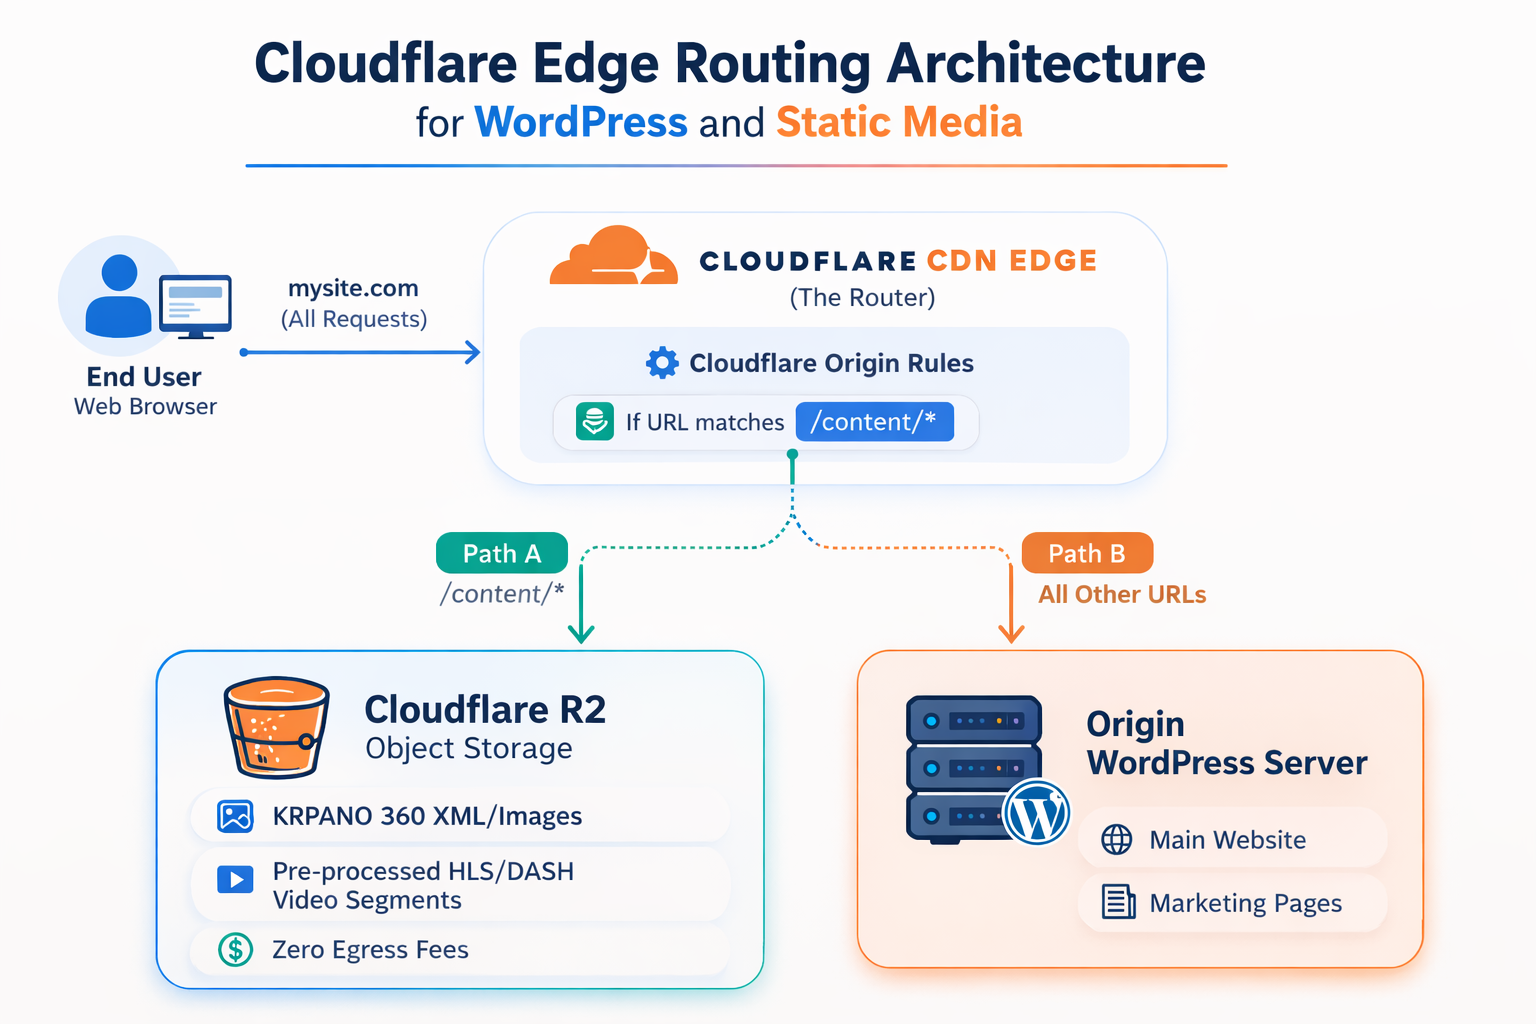
The perfect hybrid solution is to host the massive virtual tour files on object storage, while keeping the main business website on a shared hosting service like Hostinger.
A Content Delivery Network (CDN) bridges the gap and simultaneously reduces our read and write counts. A CDN is essentially a global network of copied servers. Because physical data literally travels through cables across the world to reach a device, distance matters. CDNs store copies of your data on servers geographically closer to the end user, drastically reducing load times. A CDN also acts as a protective buffer against excess read requests to the main server, mitigating the risk of DDoS attacks and runaway web crawlers. Best of all, it can route traffic seamlessly. For example, visitors going to mywebsite.com/content/ can be routed to the object storage server, while visitors clicking mywebsite.com/about_us/ are routed to the shared WordPress server.
My current plan is to use Cloudflare R2 for object storage, Cloudflare’s CDN for content distribution and traffic routing, and a shared service like Hostinger for WordPress hosting. This combination should deliver fast loading speeds, low maintenance, predictable costs, and robust protection against DDoS attacks.
There is one caveat to Cloudflare’s CDN. Their servers purge cached content based on a “Least Recently Used” (LRU) policy. This means older tours that do not get frequent visits might lose their cached status, causing them to load slightly slower until they are accessed frequently again. Bunny.net offers a compelling alternative to this issue with their CDN and Geo-Replication services, though at a higher cost. As the business scales, I can proactively transition the CDN and object storage to Bunny.net with minimal downtime.
Bonus: 360 Reconstruction Research

Creating detailed home-scale 3D reconstructions from iPhone LiDAR and manual retopology has proven time-consuming and difficult to scale. I began to consider alternatives and found inspiration in the processes applied by some commercial tools. Seeing validation that acceptable 3D reconstructions could be formed exclusively from 360-degree photos excited me. I began to review the available options and what roles they might play in my effort to provide meaningful viewing experiences.
First, I tried using a familiar tool: RealityScan (also known as RealityCapture) by Epic Games. This tool is great for aligning cameras and creating meshes from the results. I broke the 360-degree equirectangular images into six image cube maps, with one image representing each side of the photo. However, out of about 700 photos, RealityScan determined only 63 were usable. The resulting scan was unusable, making it clear this tool was not the right fit.
Next, I decided to try MiDaS, a tool that computes depth from a single image. The initial result was exciting because it got some of the geometry correct! While the room appeared similar to the real space, it was obviously unusable due to bowed-out sides that made it look like a pumpkin.
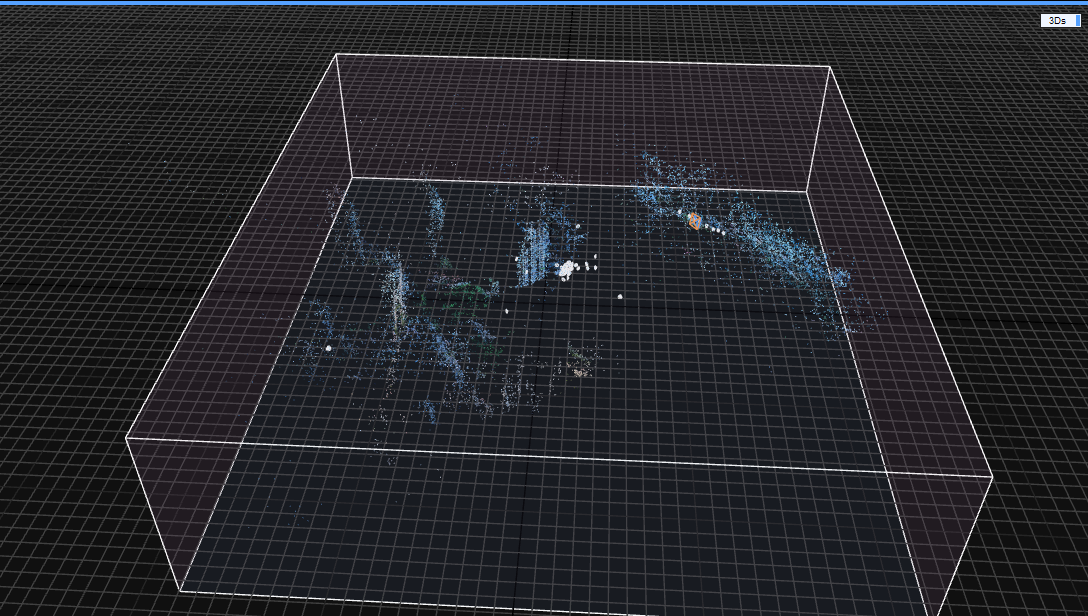
That is when I began looking into libraries like DA360 and DAP. Both operate similarly to MiDaS but are trained specifically on 360-degree equirectangular photos. I quickly received a much cleaner output in the form of a point cloud. The walls were squared off, and items on the tables even began to take shape.
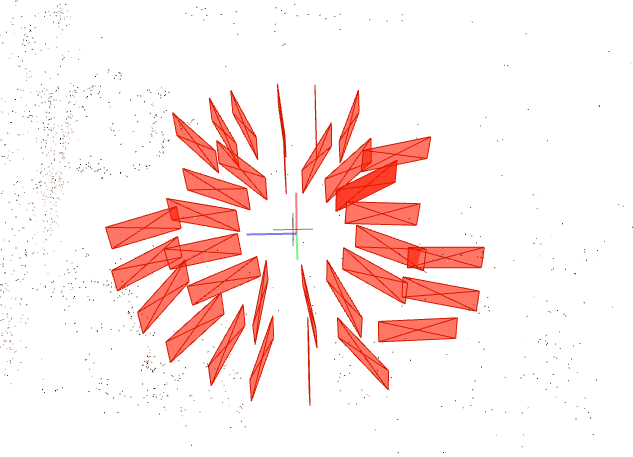
Now I know 2D images could become 3D spaces. The next step was to determine where each camera existed in that 3D space. Camera positions from photos are usually calculated using Structure from Motion (SfM) algorithms. I found one called SphereSfM, which is specifically created for use with spherical image data like the output from 360 cameras. I ran a provided dataset through the tool, and it effectively calculated many of the image positions.
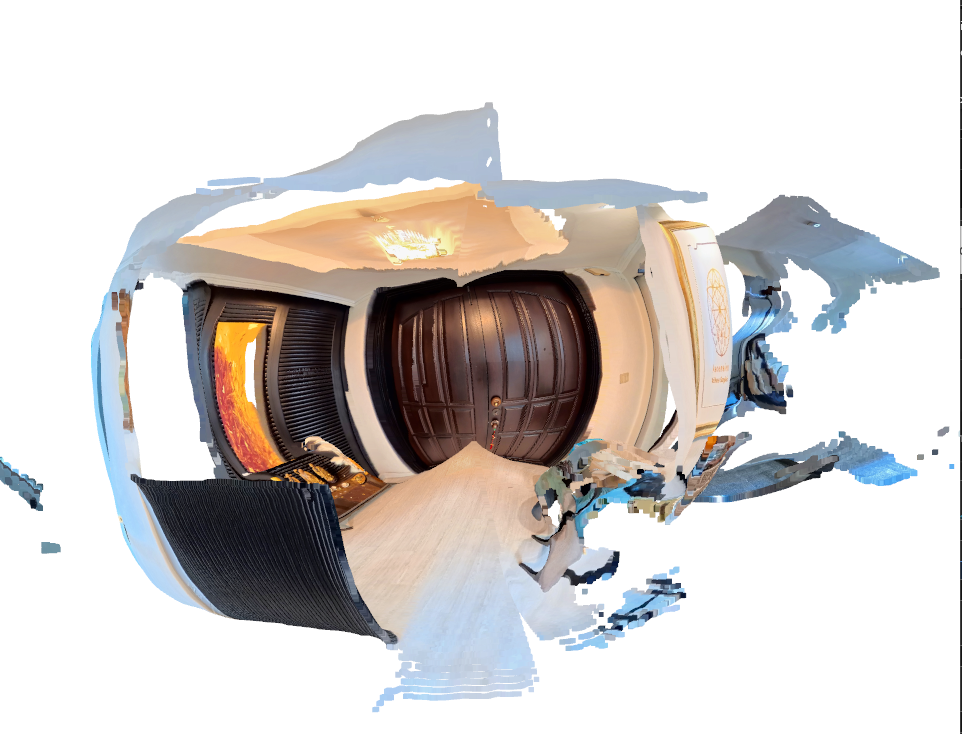
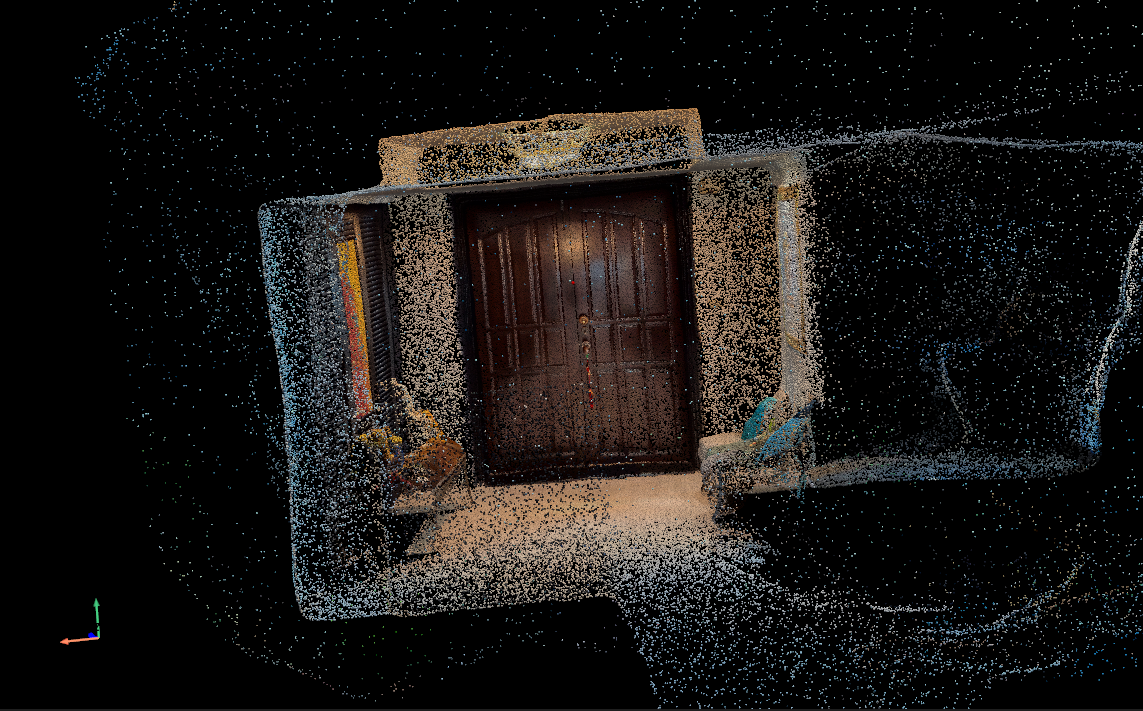
So, how do we take those individual 3D scenes and camera positions and put them together to form one cohesive 3D model? I found an interesting research paper that claims to accomplish this using a process called 360Recon. Out of curiosity, I tried to run the program to see proof of concept. This involved managing a variety of environmental difficulties. While attempting to download the project’s dependencies, I ran into several issues. It took considerable time to properly configure the Conda environment and complete the necessary installations within the Windows Subsystem for Linux (WSL) required to run it. Finally, the software was up and running. I modified the test data to fit the format required by the 360Recon project and used it as input. A 3D model was successfully generated! However, I may need to modify the dataset or the tool further, as the final output was far from the expected result pictured in the test data.
My goal of 3D reconstruction from 360 photos can be broken down into three steps:
- Convert 360 photos to individual 3D spaces.
- Record relative positions of cameras.
- Combine 3D spaces into a single 3D model.
This week, I was able to confirm that all three requirements are possible through different methods. The next step is to determine how all of these can be put together, or to see if there are already licensable solutions that effectively combine these steps. An interesting addition to this would be finding a way to create the reconstruction on mobile devices in a lower quality to serve as a live preview.
Summary
Over the course of this week, I considerably altered my perspective on what the experience does, what it will be able to do, and how we might be able to achieve it. Efficient, cost-effective hosting will allow the experience to expand and showcase more spaces to more people. 3D dioramas offer an intuitive way to navigate spaces, and providing a scalable solution is necessary to offer the service for properties outside of a standard size range. Furthermore, achieving 3D reconstruction solely from 360 images increases the inherent value of each photo taken. Spaces no longer need to be manually scanned, which cuts down on capture time, reduces labor costs, and minimizes the required tools. I hope the information gained this week will support and better guide my judgments going forward.