
Accomplishments
- Minor UX improvements and Bugfixes
- Research Video Playback Challenges
- Paginated VR Grid Menu
Bonus
- Thumbnail Update Tool
To continue improving the user experience (UX) for viewers in virtual reality (VR) I decided to create a 3D version of the image gallery menu designed in Week 2. A gallery menu option allows viewers to select the exact scene they want to view in the fewest clicks. This greatly reduces the friction when navigating dense tours or sporadic image galleries. Through this implementation, I identified edge cases affecting the existing vr menus. This includes an issue that relies on the video playback process and requires more investigation. As a bonus, I was able to produce a tool for editing the panorama thumbnails that appear in the custom grid view to allow for optional adjustments.
Minor UX improvements and Bugfixes:
The increased focus on VR functionality has lead to more user journeys being tested and improvements being identified. Hotspots, the images we use in 3D, are used for a variety of cases and should appear or disappear based on specific criteria. They also animate. When using menus like the media controls menu, a viewer will be surprised if these animations are delayed, or are not synchronized between the immersive view and the 2D view. The 360 images transition too, and it’s important that these transitions handle well in VR as to not disorient the viewer. All of these challenges found resolution through my work this week.
The two categories of hotspot that had incorrect visibility were the information hotspots (infospots) and the VR 3D cursor.
Information hotspots were implemented in week 6 and when hovered over they spawn a 2D HTML snippet (or iframe) onto the screen. This occurs in 2D space and uses the document object model (DOM) which is not available in 3D immersive VR scenes. Because the HTML could not be displayed, I added a value to each infospot which triggers the html display. I then added check when entering and exiting VR to show or hide them. Now the infospot feature does not appear when in an immersive VR view.
In VR we don’t have a traditional mouse and cursor. We often select items by pointing with our controller or finger. Usually a line is drawn from the hand to the nearest surface where you are pointing and a small circle or 3D cursor appears to show what you are about to click. This feedback tells viewers they can interact, and what they are about to interact with. While working with last week’s VR menu, I noticed that hiding the menu also hid the 3D cursor. The logic that hides the vr menu searches the scene for all hotspots with a specific tag, animates them out, and removes them from the scene. The 3D cursor in use comes from a third party tool. Unknowingly, I had provided the same tag to my vr menu items that was being used by the 3D cursor. I updated the tag on my items to be more specific to my use case, and this fixed the issue.
When you turn a faucet or flick a switch, it’s expected that water or light immediately appears. That is the nature of reality. Cause begets action immediately. Virtual reality is different, it can have a cause and pause. A delayed reaction immediately signals to our brain “something might be wrong”. While interacting with the media player I noticed a variety of steps which lead to animations and reactions lagging behind or completely ignoring my input. Animating between scenes, or transitioning, in VR would freeze. Under certain conditions toggling the media center would stall or never react, and in many cases would get desynchronized from its 2D counterpart.
For the media controls menu most of the cases identified were resolved by setting flags and adjusting timings. Some extra steps were added to check and confirm synchronization between 2D and 3D menus.
In the case of the VR transitions I had to get a bit creative. Scenes transition differently depending on how you are moving between them. In a tour without 3D elements the 360 images can simply fade and blend from one to another. In 3D tours the camera’s position teleports to another location during the transition. During this move there are a few moments where the 3D space appears stretched and warped due to how the previous image is painted onto it. Instead we use an intermediate scene of all black.
Imagine navigating a website and every time you clicked a new tab the whole screen, including the menu bar, went completely black for a moment. You may ask yourself what might be wrong. Without a menu bar we cannot return home or navigate to another page, our only option is to reset the browser or go back. In VR these options are much more costly. If you’re immersed in an environment, asking you to restart the browser or refresh the page is like asking you to get out of the pool and dry off just so that you can hop in again. It’s cumbersome and sours the experience. And further, you’re not just staring at a black screen, you become immersed in a black void. With no visual anchor points you can quickly feel disoriented and concerned, even in this brief moment of transition. To solve the concern about losing control and the disorientation of a black void I updated the transitions to retain only the vr menu. This gives a consistent reference point, and the feeling of control and ability to make a change if the black screen were to persist beyond the consistent transition period.
Research Video Playback Challenges
Adjusting timings and setting flags solved most, but not all, challenges with animating the media controls menu. I wondered why I had not seen these issues during development, and why they were only appearing intermittently. Issues with logic and calculations performed in the browser are often consistent and perform identically every time. The same is not true for networking where the server’s load, the network’s speed, and wireless signal strength may all vary moment to moment. This was cause for many animations to be triggered late, or actions to fail.
During testing I run a simple server on my local network. Last week I tested using http and video streaming quality worked fine. This week I began serving over https. The “S” in https stands for secure and the content being sent is encrypted. Encrypted content takes more processing. The server has to calculate how to encrypt it, the encryption process makes the file larger which takes longer to send, and the client has to decrypt the file once received. This is part of why some of my devices began to experience delay this week when switching to https when video streaming.
A simple solution to this would be to load the site only in https, as that is required for VR support, and load all image and video content over http. However; this scenario shines light on a subsequent issue. The native way in which video is shared over the web forces the browser to load large chunks of video before they can be played. My one minute test video has 8K resolution and over 700MB. This is a lot of data to be served and processed in real time. This extra time causes animations to delay, and the transition from image to video to be slow.
So, how do companies like Youtube steam 8K 360 videos so seamlessly? Bad Bunny’s 360 Visualizaer of “Andrea” likely wouldn’t have reached 255 Million views if the experience were slow andterrible. Youtube and other companies use advanced tools that go beyond the browser’s default video playback. Two tools worth noting are Http Live Streaming (HLS) and Dynamic Adaptive Streaming over HTTP (DASH). Both tools involve breaking the single video into many files and streams those smaller files to the user over time. This makes seeking much easier as small files can be immediately sent and prepared upon request.
These tools are designed to promote Adaptive Bitrate Streaming (ABR). ABR allows different resolutions to be streamed depending on network speed. So if things slow down, instead of a paused video the resolution may just drop slightly.
Solutions to this challenge exist. Someone developed a paid tool that simplifies HLS support, and steps to implement DASH steaming are available for free. These solutions result in consequences for other areas. Namely hosting. Hosting providers often charge based on how much their services are used. The metric by which they charge can change. Some charge based on how many times a file is requested, others charge by how many gigabytes are being requested, or even how much processing the cpu had to perform to distribute the files.
When considering hosting platform(s) for 360 tours I will have to keep this in mind. Hosting a 1 minute video can easily go from a single 700MB file to 1.5 GB of dozens of files once multiple resolutions are generated and each file is broken up into sections. This may greatly increase the storage requirements and the read requests made of the host. A Contend Deliver Network (CDN) should be reviewed to ensure these files are streamed quickly, and prices for the CDN and the hosting server must be reviewed with these added considerations in mind.
Paginated Grid Layout
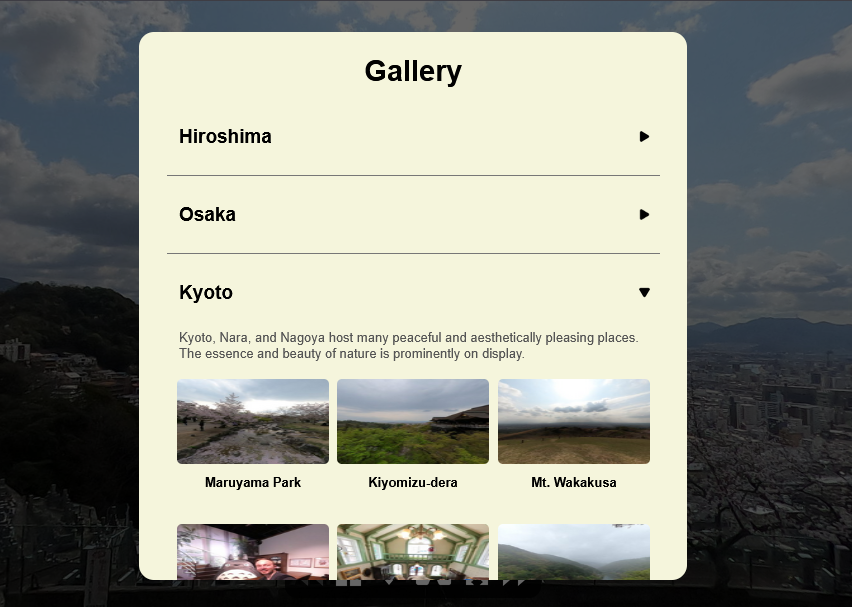
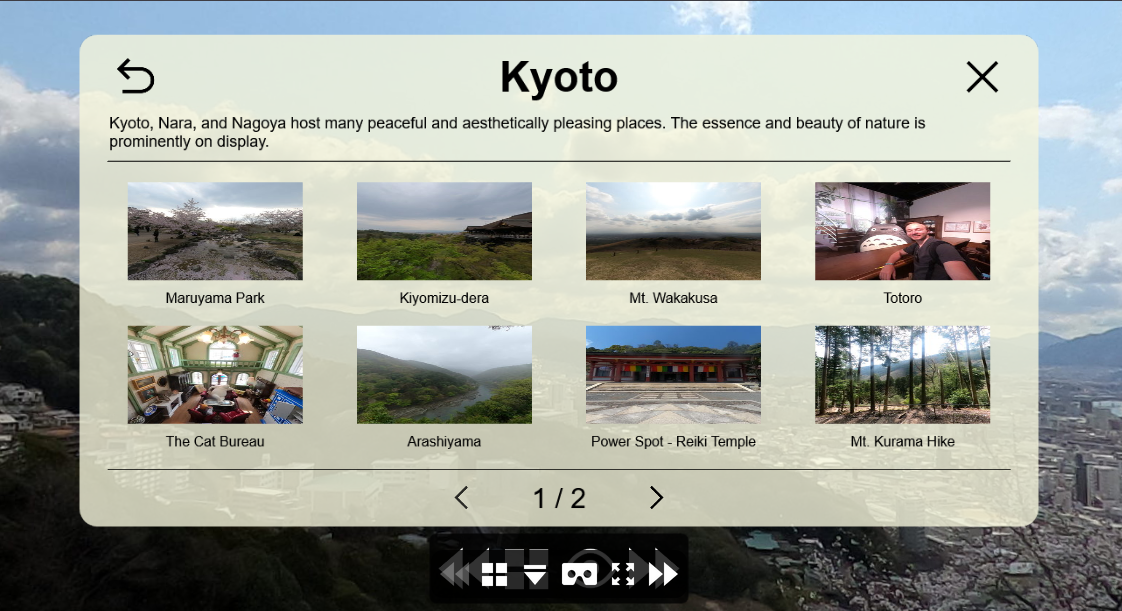
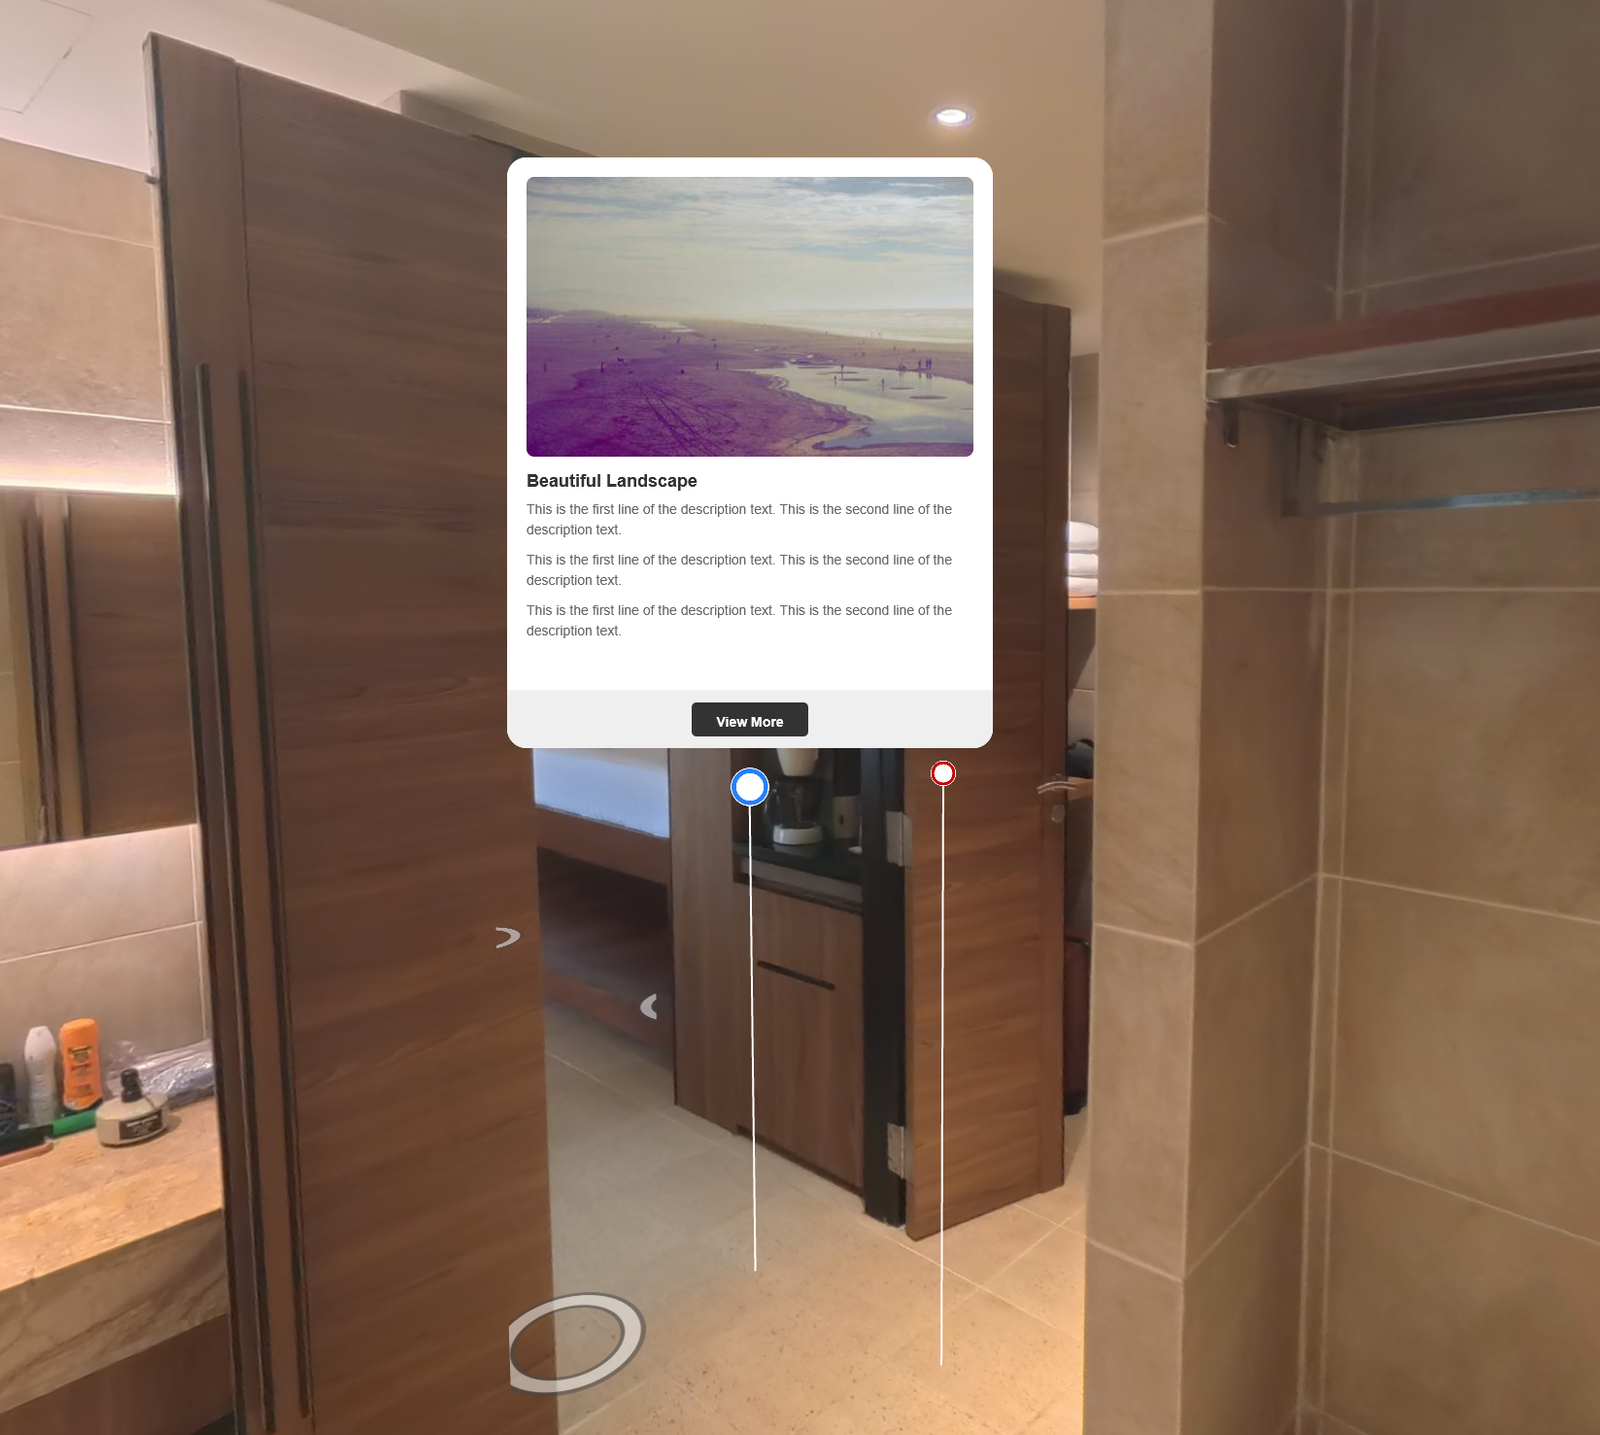
Part of the magic of virtual tours is they are like teleportation. You can go be there now! So why make someone click through the tour again if all they wanted to do was review the tiles in the third floor bathroom? Dense tours like the 3 floor Supalai Place (Supalai Place) can take minutes to navigate from the start to the specific position you want to review. This also wastes reads and bandwidth sending photos for locations that the viewer is briskly clicking beyond. We can get the viewer to there desired location much faster with a menu or gallery of the options. We have this in 2D, now it’s time to bring it to VR.
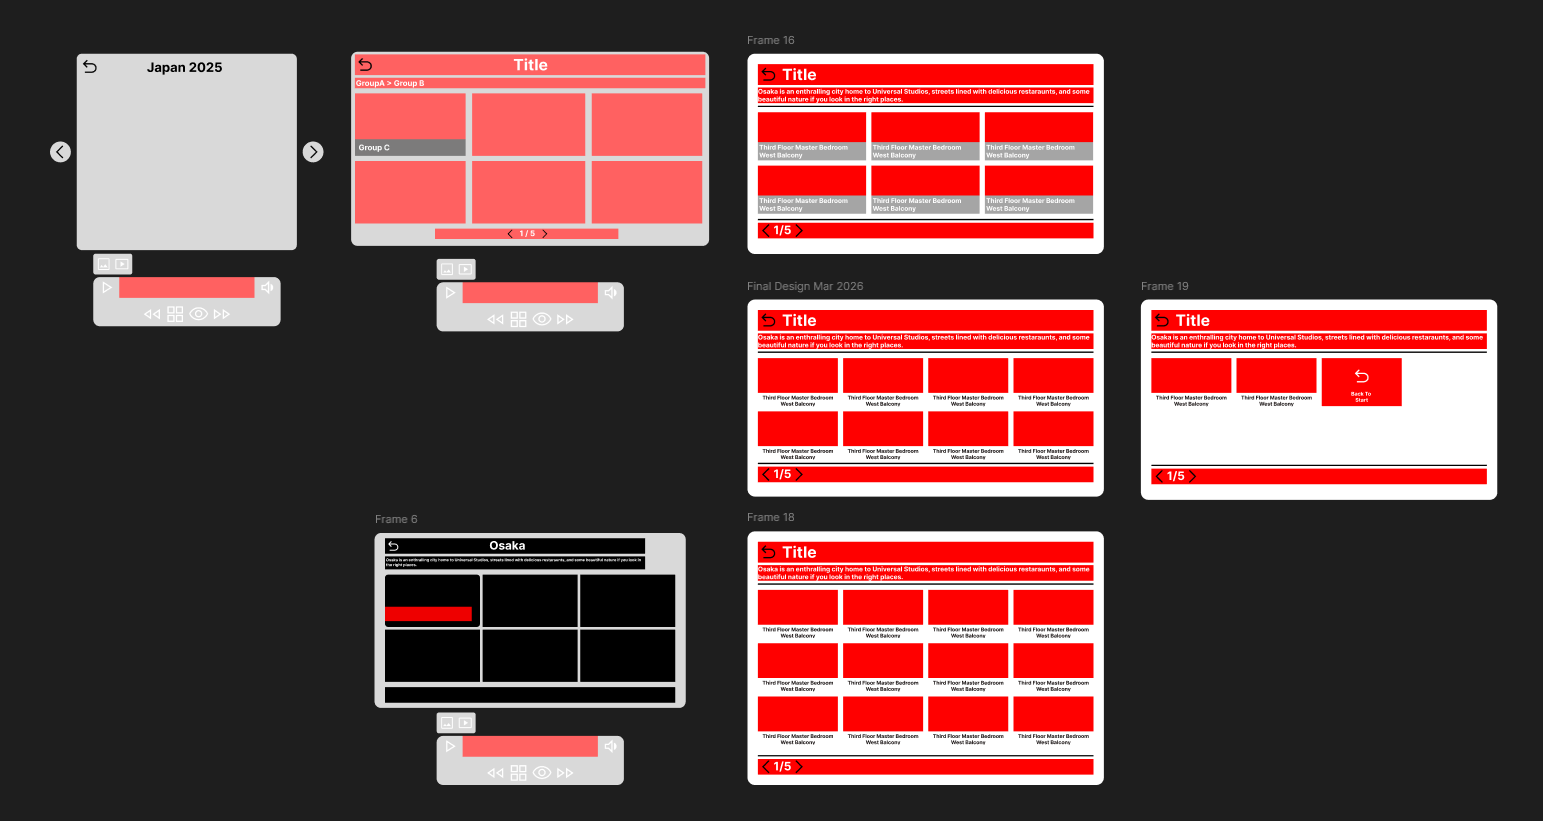
As we learned when creating the vr menu (week 8) html or DOM elements are not available in VR. So the gallery menu must be recreated in 3D with individual image hotspots floating as a menu in front of the viewer. I began by designing the basic layout using a tool called figma. This is great for rapidly ideating a variety of ideas to see what works and what doesn’t. Initially I believes two flowting buttons on either side would better fit the VR setting. Then I decided to remain consistent with the 2D menu. The other menus are consistent, and if someone is viewing the site in VR and 2D the experience should be similar where possible to align with expectations.
One major difference that was necessary was the removal of the group drop downs and scrolling. In VR we don’t have the DOM and we don’t have access to many standard 2D web features. In the 2D grid we have containers, and can hide or “mask” items and reveal them when a menu drop’s down. In 3D we don’t have that natively. Perhaps there may be some way to optionally reveal and hide items with complex animations and changes to qualities of the images (like something called z-order). Implementing this appeared complex and time consuming. Instead I went with a solution where items are displayed on a page, and pages can be flipped to see the next items. This would be quicker to implement and still provide a familiar experience to viewers.
After designing and implementing this new menu I felt very happy with the result. Animations are snappy and are consistent with the animations for the bottom menu bar. This encourages interaction and further conforms to the visual language being developed across the virtual menus.
Bonus: Thumbnail updater:
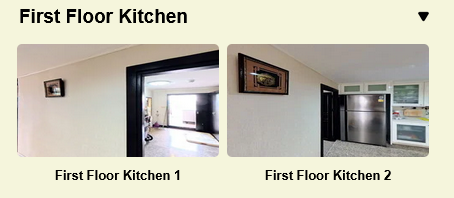
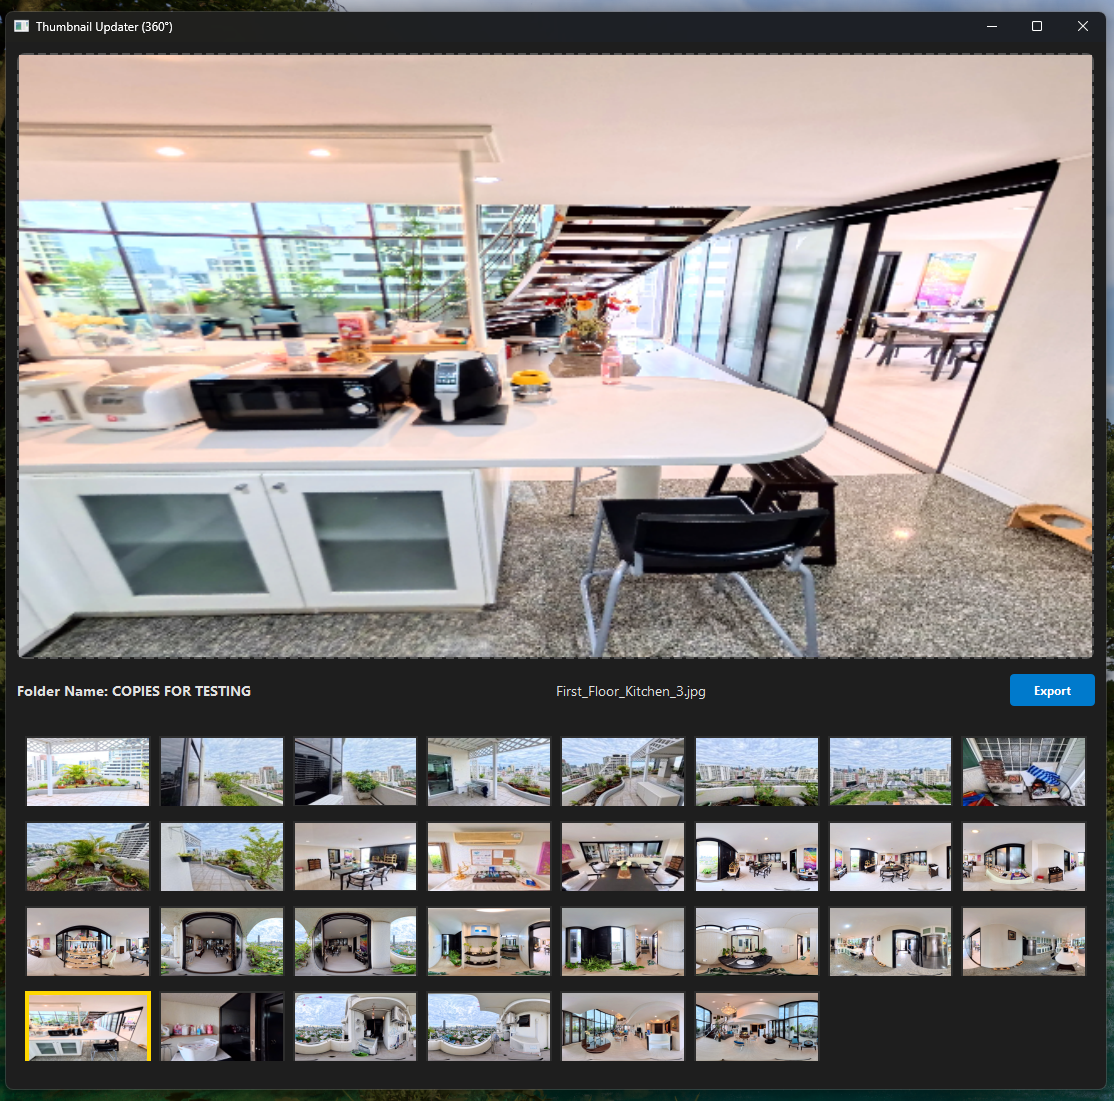
The scene galleries I have set up use grids of images and text to convey what the selected scene will look like. The image thumbnails are a small part of the 360 scene and automatically generated. Often these may be adequate; however, from the example above we can see that the crop chosen by the automation process does not always give proper context. In one image we have a doorway to a storage room, and in the other we have a refrigerator. Only one accurately conveys the name of “kitchen”. To solve this problem I made a tool that helps with updating thumbnails.
This thumbnail updating tool lets you drag in your entire folder of 360 images. It loads a grid of these images in the bottom panel. When an image is selected it appears in the top panel. Here you can move the camera and zoom to adjust the crop of the final thumbnail. Once you’ve updated all the desired thumbnails you can export the changes and they overwrite the thumbnails previously generated for the project. This project simplifies the thumbnail updating process by collecting all thumbnails into one place with all necessary editing tools.
Summary
Whether in the real world or the virtual one, providing the viewer a worthwhile experience is a primary goal of a virtual tour. This week I was able to improve the viewer’s experience by implementing a custom gallery view in VR. The custom gallery view gives the viewer more options when it comes to navigating a tour. With these options they can navigate to far away scenes more quickly and with fewer button presses. Improvements and bugfixes were also performed to make the experience more consistent and as anticipated. As a bonus I was able to build a tool for updating thumbnails which gives me more control over what context is available for people viewing the tours.